Joining in the Round Without Twisting Your Stitches
How to join cast-on stitches into a ring for a hat, check that the edge is not twisted, and tidy the small gap the join leaves behind.
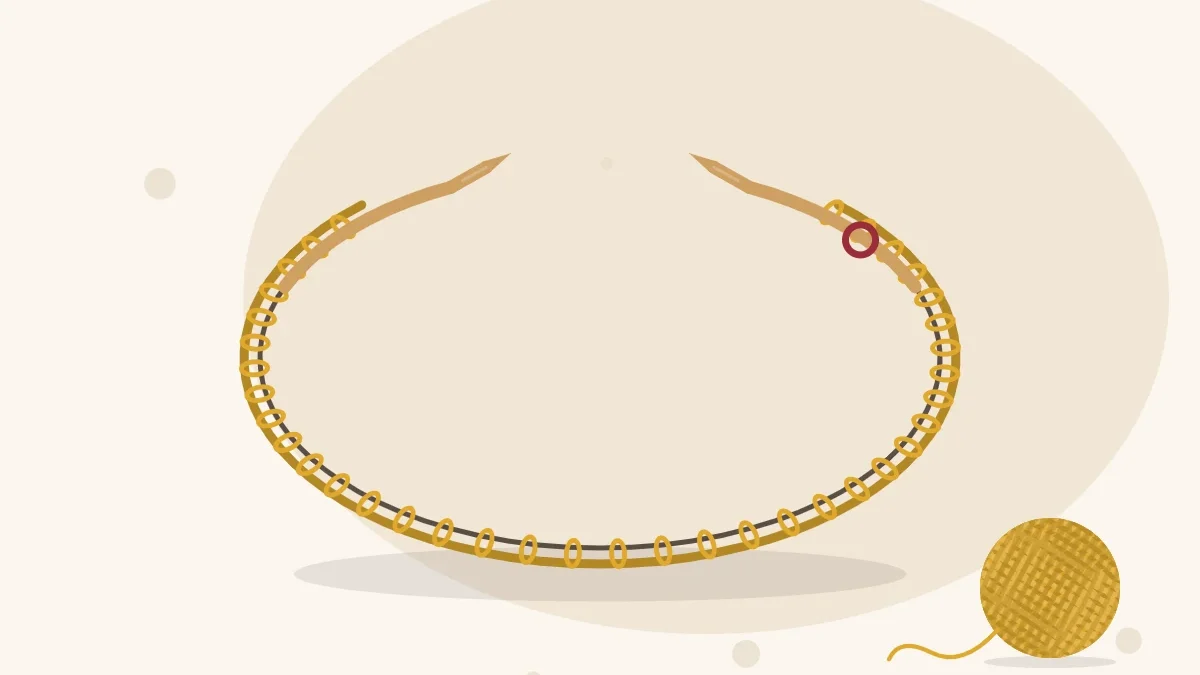
Joining in the round is the moment a row of cast-on stitches becomes a ring. It takes one stitch to do, and it is also the one place where a hat can go wrong beyond repair: if the cast-on edge is twisted around the needle when you join, the fabric grows as a twisted loop instead of a tube. The good news is that a ten-second check prevents it, and a twist caught early can still be undone.
What “Join in the Round” Means
After casting on, the stitches sit in a line along the circular needle. The first stitch you cast on is at one tip, and the last stitch, with the working yarn attached, is at the other. To join, you hold the tip with the last stitch in your right hand and knit into the first stitch on the left tip. That single stitch bridges the gap and closes the circle. From then on you keep knitting in the same direction, and the work spirals upward.
Patterns usually write it as “join to work in the round, being careful not to twist; pm for BOR”. Here pm means place marker and BOR means beginning of round, both standard terms from the Craft Yarn Council abbreviations list. If lines like that still feel cryptic, the guide on how to read a hat pattern decodes the rest.
Check for a Twist Before You Join
- Lay the needle on a table with the tips pointing toward you, working yarn on the right.
- Spread the stitches evenly along the tips and cable.
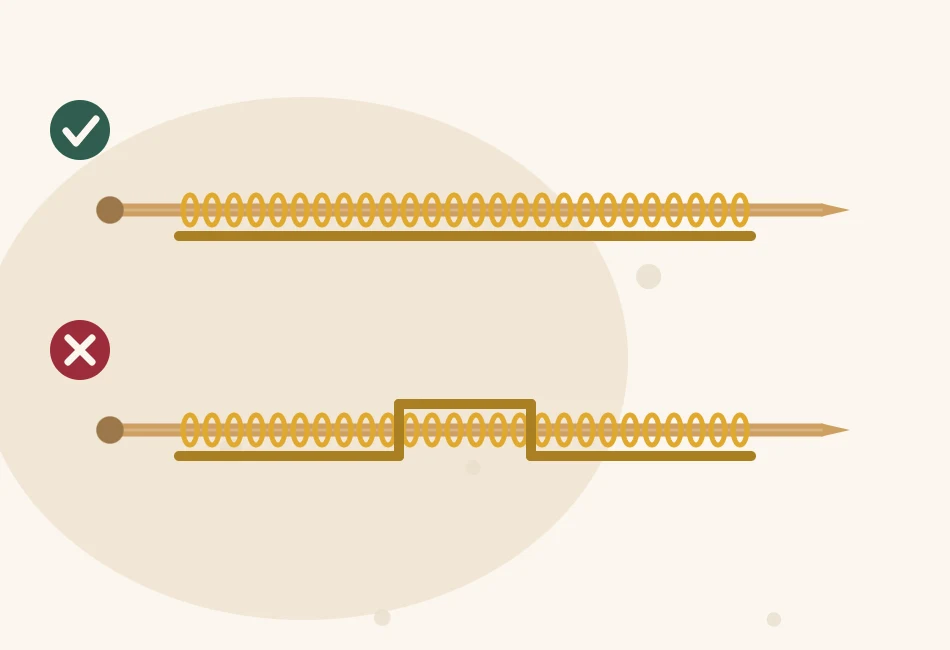
- Look at the cast-on edge, the little ridge of bumps under the stitches. Turn every part of it so it faces the inside of the circle.
- Follow the edge with a fingertip all the way around, from one tip to the other. It should never cross over the top of the needle or cable.
- Pick the needles up without letting the stitches roll, and join.
Tip
Thin stitches on a thin cable spin easily. If the edge will not stay put, knit the first two or three rows back and forth, then join. The wider strip is much easier to keep straight, and the small gap at the bottom is sewn closed later with the cast-on tail.
Three Ways to Join
All three produce a hat. They differ in how tidy the cast-on edge looks at the join.
| Method | How it works | Stitches to cast on | Result |
|---|---|---|---|
| Simple join | Place the marker and knit the first cast-on stitch firmly | The pattern number | Fastest; leaves a small step at the edge that the tail closes later |
| Swapped stitches | The first and last cast-on stitches trade places | The pattern number | The two stitches cross and pull the gap shut |
| Extra stitch | Cast on one more, then knit it together with the first stitch | The pattern number plus 1 | A firm, neat join with almost no step |
Simple join
Slip a marker onto the right needle tip. Knit (or work in pattern) into the first stitch on the left tip and pull the yarn snug. Work the next two stitches a little tighter than usual as well, since the slack between the tips tends to settle there.
Swapped stitches
Slip the first cast-on stitch from the left tip to the right tip. Then lift the last cast-on stitch, now second on the right tip, over that stitch and place it on the left tip. Place the marker and begin the round. The stitch count has not changed.
Extra stitch
If the pattern calls for 88 stitches, cast on 89. Slip the extra stitch from the right tip to the left tip, place the marker on the right tip, and knit the extra stitch together with the first stitch (k2tog). You are back to 88, and that k2tog counts as the first stitch of round 1. In ribbing that begins with a knit stitch, it simply takes the place of that knit.
Mark the Beginning of the Round
In the round there are no row ends to tell you where you are, so the marker does that job. Each time you reach it, slip it from the left tip to the right and carry on; one full circuit is one round. Use a ring marker that slides freely on your needle size, or tie a small loop of smooth contrasting yarn. The cast-on tail hangs just below the marker and makes a handy second check.
If This Happens, Do That
You notice a twist during round 1
Finish the round. Until you knit into the first stitch of round 2, the ring is held together by a single strand of yarn at the join, so you can still rotate the cast-on edge around the needle until it lies straight. The twist ends up in that one strand, where it is hard to see once the tail is woven in.
You notice a twist after round 2 or later
There is no fix that keeps the knitting. The twist is locked into the fabric, and the only cure is to pull the work off the needle, unravel and cast on again. It stings, but it costs far less at round 3 than at the crown.
Watch out
Check for a twist one more time at the end of round 1, before you knit into round 2. It is the last chance to correct it.
There is a gap or step at the cast-on edge
This is normal with the simple join. When the hat is finished, thread the cast-on tail onto a tapestry needle, pass it under the edge stitch on the other side of the gap, pull until the edge looks level, and weave the tail in on the inside.
The stitches will not reach around the needle
The stitches should span the needle without being stretched. A 16-inch circular suits most adult hats; a small child’s hat may have too few stitches for it. The article on needles for knitting hats explains the alternatives, including double-pointed needles and magic loop.
A loose column appears above the join
Slack between the last stitch of one round and the first of the next shows up as a ladder. Tug the yarn gently after the first stitch of each round for the first inch or so, and it evens out.
Where to Practice
A plain hat is the best place to learn the join, because the first few rounds are ribbing and any unevenness disappears into it. Your first hat on circular needles walks through the whole process slowly, and the classic knit beanie is a good second project. A twisted cast-on also heads the list of common hat-knitting mistakes, alongside other early slips worth knowing about before you start.
Frequently asked questions
How do I know if my stitches are twisted?
Lay the needle flat and follow the cast-on edge with a fingertip from one tip to the other. It should stay on the inside of the ring the whole way. If it crosses over the top of the needle or cable at any point, the stitches are twisted.
Can I fix a twist after I have joined?
Only during the first round. Before you knit into round 2, the ring is held by a single strand, so the edge can still be rotated straight. After that the twist is locked in and the work has to be unraveled and cast on again.
Why is there a gap where I joined?
The first and last cast-on stitches sit one step apart, which leaves a small notch at the edge. It is normal. Close it at the end by passing the cast-on tail across the gap before weaving it in.
Do I need a stitch marker?
Yes, or a loop of contrasting yarn. Knitting in the round has no row ends, so the marker is the only reliable sign that a round is complete, and crown decreases depend on starting in the right place.